引用自http://blog.csdn.net/wh211212/article/details/54285921


命令:curl

在Linux中curl是一个利用URL规则在命令行下工作的文件传输工具,可以说是一款很强大的http命令行工具。它支持文件的上传和下载,是综合传输工具,但按传统,习惯称url为下载工具。

语法:# curl [option] [url]

常见参数:

复制代码

复制代码

-A/--user-agent <string>              设置用户代理发送给服务器
-b/--cookie <name=string/file>    cookie字符串或文件读取位置
-c/--cookie-jar <file>                    操作结束后把cookie写入到这个文件中
-C/--continue-at <offset>            断点续转
-D/--dump-header <file>              把header信息写入到该文件中
-e/--referer                                  来源网址
-f/--fail                                          连接失败时不显示http错误
-o/--output                                  把输出写到该文件中
-O/--remote-name                      把输出写到该文件中,保留远程文件的文件名
-r/--range <range>                      检索来自HTTP/1.1或FTP服务器字节范围
-s/--silent                                    静音模式。不输出任何东西
-T/--upload-file <file>                  上传文件
-u/--user <user[:password]>      设置服务器的用户和密码
-w/--write-out [format]                什么输出完成后
-x/--proxy <host[:port]>              在给定的端口上使用HTTP代理
-#/--progress-bar                        进度条显示当前的传送状态

复制代码

复制代码

例子:
1、基本用法

# curl http://www.linux.com

执行后,www.linux.com 的html就会显示在屏幕上了
Ps:由于安装linux的时候很多时候是没有安装桌面的,也意味着没有浏览器,因此这个方法也经常用于测试一台服务器是否可以到达一个网站

2、保存访问的网页
2.1:使用linux的重定向功能保存

# curl http://www.linux.com >> linux.html

2.2:可以使用curl的内置option:-o(小写)保存网页

$ curl -o linux.html http://www.linux.com

执行完成后会显示如下界面,显示100%则表示保存成功

% Total    % Received % Xferd  Average Speed  Time    Time    Time  Current
                                Dload  Upload  Total  Spent    Left  Speed
100 79684    0 79684    0    0  3437k      0 --:--:-- --:--:-- --:--:-- 7781k

2.3:可以使用curl的内置option:-O(大写)保存网页中的文件
要注意这里后面的url要具体到某个文件,不然抓不下来

# curl -O http://www.linux.com/hello.sh

3、测试网页返回值

# curl -o /dev/null -s -w %{http_code} www.linux.com

Ps:在脚本中,这是很常见的测试网站是否正常的用法

4、指定proxy服务器以及其端口
很多时候上网需要用到代理服务器(比如是使用代理服务器上网或者因为使用curl别人网站而被别人屏蔽IP地址的时候),幸运的是curl通过使用内置option:-x来支持设置代理

# curl -x 192.168.100.100:1080 http://www.linux.com

5、cookie
有些网站是使用cookie来记录session信息。对于chrome这样的浏览器,可以轻易处理cookie信息,但在curl中只要增加相关参数也是可以很容易的处理cookie
5.1:保存http的response里面的cookie信息。内置option:-c(小写)

# curl -c cookiec.txt  http://www.linux.com

执行后cookie信息就被存到了cookiec.txt里面了

5.2:保存http的response里面的header信息。内置option: -D

# curl -D cookied.txt http://www.linux.com

执行后cookie信息就被存到了cookied.txt里面了

注意:-c(小写)产生的cookie和-D里面的cookie是不一样的。


5.3:使用cookie
很多网站都是通过监视你的cookie信息来判断你是否按规矩访问他们的网站的,因此我们需要使用保存的cookie信息。内置option: -b

# curl -b cookiec.txt http://www.linux.com

6、模仿浏览器
有些网站需要使用特定的浏览器去访问他们,有些还需要使用某些特定的版本。curl内置option:-A可以让我们指定浏览器去访问网站

# curl -A "Mozilla/4.0 (compatible; MSIE 8.0; Windows NT 5.0)" http://www.linux.com

这样服务器端就会认为是使用IE8.0去访问的

7、伪造referer(盗链)
很多服务器会检查http访问的referer从而来控制访问。比如:你是先访问首页,然后再访问首页中的邮箱页面,这里访问邮箱的referer地址就是访问首页成功后的页面地址,如果服务器发现对邮箱页面访问的referer地址不是首页的地址,就断定那是个盗连了
curl中内置option:-e可以让我们设定referer

# curl -e "www.linux.com" http://mail.linux.com

这样就会让服务器其以为你是从www.linux.com点击某个链接过来的

8、下载文件
8.1:利用curl下载文件。
#使用内置option:-o(小写)

# curl -o dodo1.jpg http:www.linux.com/dodo1.JPG

#使用内置option:-O(大写)

# curl -O http://www.linux.com/dodo1.JPG

这样就会以服务器上的名称保存文件到本地

8.2:循环下载
有时候下载图片可以能是前面的部分名称是一样的,就最后的尾椎名不一样

# curl -O http://www.linux.com/dodo[1-5].JPG

这样就会把dodo1,dodo2,dodo3,dodo4,dodo5全部保存下来

8.3:下载重命名

# curl -O http://www.linux.com/{hello,bb}/dodo[1-5].JPG

由于下载的hello与bb中的文件名都是dodo1,dodo2,dodo3,dodo4,dodo5。因此第二次下载的会把第一次下载的覆盖,这样就需要对文件进行重命名。

# curl -o #1_#2.JPG http://www.linux.com/{hello,bb}/dodo[1-5].JPG

这样在hello/dodo1.JPG的文件下载下来就会变成hello_dodo1.JPG,其他文件依此类推,从而有效的避免了文件被覆盖

8.4:分块下载
有时候下载的东西会比较大,这个时候我们可以分段下载。使用内置option:-r

# curl -r 0-100 -o dodo1_part1.JPG http://www.linux.com/dodo1.JPG
# curl -r 100-200 -o dodo1_part2.JPG http://www.linux.com/dodo1.JPG
# curl -r 200- -o dodo1_part3.JPG http://www.linux.com/dodo1.JPG
# cat dodo1_part* > dodo1.JPG

这样就可以查看dodo1.JPG的内容了

8.5:通过ftp下载文件
curl可以通过ftp下载文件,curl提供两种从ftp中下载的语法

# curl -O -u 用户名:密码 ftp://www.linux.com/dodo1.JPG
# curl -O ftp://用户名:密码@www.linux.com/dodo1.JPG

8.6:显示下载进度条

# curl -# -O http://www.linux.com/dodo1.JPG

8.7:不会显示下载进度信息

# curl -s -O http://www.linux.com/dodo1.JPG

9、断点续传
在windows中,我们可以使用迅雷这样的软件进行断点续传。curl可以通过内置option:-C同样可以达到相同的效果
如果在下载dodo1.JPG的过程中突然掉线了,可以使用以下的方式续传

# curl -C -O http://www.linux.com/dodo1.JPG

10、上传文件
curl不仅仅可以下载文件,还可以上传文件。通过内置option:-T来实现

# curl -T dodo1.JPG -u 用户名:密码 ftp://www.linux.com/img/

这样就向ftp服务器上传了文件dodo1.JPG

11、显示抓取错误

# curl -f http://www.linux.com/error

其他参数(此处翻译为转载):

复制代码

复制代码

-a/--append                        上传文件时,附加到目标文件
--anyauth                            可以使用“任何”身份验证方法
--basic                                使用HTTP基本验证
-B/--use-ascii                      使用ASCII文本传输
-d/--data <data>                  HTTP POST方式传送数据
--data-ascii <data>            以ascii的方式post数据
--data-binary <data>          以二进制的方式post数据
--negotiate                          使用HTTP身份验证
--digest                        使用数字身份验证
--disable-eprt                  禁止使用EPRT或LPRT
--disable-epsv                  禁止使用EPSV
--egd-file <file>              为随机数据(SSL)设置EGD socket路径
--tcp-nodelay                  使用TCP_NODELAY选项
-E/--cert <cert[:passwd]>      客户端证书文件和密码 (SSL)
--cert-type <type>              证书文件类型 (DER/PEM/ENG) (SSL)
--key <key>                    私钥文件名 (SSL)
--key-type <type>              私钥文件类型 (DER/PEM/ENG) (SSL)
--pass  <pass>                  私钥密码 (SSL)
--engine <eng>                  加密引擎使用 (SSL). "--engine list" for list
--cacert <file>                CA证书 (SSL)
--capath <directory>            CA目   (made using c_rehash) to verify peer against (SSL)
--ciphers <list>                SSL密码
--compressed                    要求返回是压缩的形势 (using deflate or gzip)
--connect-timeout <seconds>    设置最大请求时间
--create-dirs                  建立本地目录的目录层次结构
--crlf                          上传是把LF转变成CRLF
--ftp-create-dirs              如果远程目录不存在,创建远程目录
--ftp-method [multicwd/nocwd/singlecwd]    控制CWD的使用
--ftp-pasv                      使用 PASV/EPSV 代替端口
--ftp-skip-pasv-ip              使用PASV的时候,忽略该IP地址
--ftp-ssl                      尝试用 SSL/TLS 来进行ftp数据传输
--ftp-ssl-reqd                  要求用 SSL/TLS 来进行ftp数据传输
-F/--form <name=content>        模拟http表单提交数据
-form-string <name=string>      模拟http表单提交数据
-g/--globoff                    禁用网址序列和范围使用{}和[]
-G/--get                        以get的方式来发送数据
-h/--help                      帮助
-H/--header <line>              自定义头信息传递给服务器
--ignore-content-length        忽略的HTTP头信息的长度
-i/--include                    输出时包括protocol头信息
-I/--head                      只显示文档信息
-j/--junk-session-cookies      读取文件时忽略session cookie
--interface <interface>        使用指定网络接口/地址
--krb4 <level>                  使用指定安全级别的krb4
-k/--insecure                  允许不使用证书到SSL站点
-K/--config                    指定的配置文件读取
-l/--list-only                  列出ftp目录下的文件名称
--limit-rate <rate>            设置传输速度
--local-port<NUM>              强制使用本地端口号
-m/--max-time <seconds>        设置最大传输时间
--max-redirs <num>              设置最大读取的目录数
--max-filesize <bytes>          设置最大下载的文件总量
-M/--manual                    显示全手动
-n/--netrc                      从netrc文件中读取用户名和密码
--netrc-optional                使用 .netrc 或者 URL来覆盖-n
--ntlm                          使用 HTTP NTLM 身份验证
-N/--no-buffer                  禁用缓冲输出
-p/--proxytunnel                使用HTTP代理
--proxy-anyauth                选择任一代理身份验证方法
--proxy-basic                  在代理上使用基本身份验证
--proxy-digest                  在代理上使用数字身份验证
--proxy-ntlm                    在代理上使用ntlm身份验证
-P/--ftp-port <address>        使用端口地址,而不是使用PASV
-Q/--quote <cmd>                文件传输前,发送命令到服务器
--range-file                    读取(SSL)的随机文件
-R/--remote-time                在本地生成文件时,保留远程文件时间
--retry <num>                  传输出现问题时,重试的次数
--retry-delay <seconds>        传输出现问题时,设置重试间隔时间
--retry-max-time <seconds>      传输出现问题时,设置最大重试时间
-S/--show-error                显示错误
--socks4 <host[:port]>          用socks4代理给定主机和端口
--socks5 <host[:port]>          用socks5代理给定主机和端口
-t/--telnet-option <OPT=val>    Telnet选项设置
--trace <file>                  对指定文件进行debug
--trace-ascii <file>            Like --跟踪但没有hex输出
--trace-time                    跟踪/详细输出时,添加时间戳
--url <URL>                    Spet URL to work with
-U/--proxy-user <user[:password]>  设置代理用户名和密码
-V/--version                    显示版本信息
-X/--request <command>          指定什么命令
-y/--speed-time                放弃限速所要的时间。默认为30
-Y/--speed-limit                停止传输速度的限制,速度时间'秒
-z/--time-cond                  传送时间设置
-0/--http1.0                    使用HTTP 1.0
-1/--tlsv1                      使用TLSv1(SSL)
-2/--sslv2                      使用SSLv2的(SSL)
-3/--sslv3                      使用的SSLv3(SSL)
--3p-quote                      like -Q for the source URL for 3rd party transfer
--3p-url                        使用url,进行第三方传送
--3p-user                      使用用户名和密码,进行第三方传送
-4/--ipv4                      使用IP4
-6/--ipv6                      使用IP6
复制代码


http://mirrors.huaweicloud.com/centos/8.3.2011/isos/x86_64/

基本介绍

backup主页链接

BackupPC是一种高性能的企业级系统,用于将Linux,Windows和macOS PC和便携式计算机备份到服务器磁盘。 BackupPC是高度可配置的,并且易于安装和维护。

特点:

  1. Web interface Web界面使管理员可以查看日志文件,配置,当前状态,并允许用户启动和取消备份以及浏览和还原备份中的文件。

  2. Data deduplication 重复数据删除:同一或不同PC的多个备份中的相同文件仅存储一次,从而大大节省了磁盘存储和磁盘I / O。 这里的相同文件删除, 啥文件算是相同的,要是仅仅同名就删除可坏菜了

  3. Compression 由于仅需要压缩新文件(尚未合并),因此对CPU时间的影响不大。

  4. Open-source BackupPC托管在Github上,并根据GPL许可证进行分发。

  5. No client-side software is needed.

Installing BackupPC 4 from tarball on CentOS 7

部署backuppc

安装的backuppc的版本是4.3.1。(自己装着玩的用了3台虚拟机)。

  1. Enable the epel-release repo.

yum --enablerepo=extras -y install epel-release1
  1. Install BackupPC-XS and rsync-bpc

yum --enablerepo=epel-testing -y install BackupPC-XS rsync-bpc1
  1. Install the following requisites for BackupPC version 4.3.1

yum -y install bzip2 httpd mod_perl par2cmdline perl-Archive-Zip perl-CGI \
perl-Compress-Raw-Zlib perl-Data-Dumper perl-Digest-MD5 perl-File-Listing \
perl-File-RsyncP perl-Net-FTP-AutoReconnect perl-Net-FTP-RetrHandle \
perl-Time-ParseDate perl-XML-RSS perl-version rrdtool samba-client1234
  1. Lets set up some directories that we are going to use later.

这个地方我在一台机器上创建的需要的文件夹。底下是原作者讲的话(我的backuppc服务器在/ data0 /上安装了raid6阵列。 我将使用它来存储backuppc的数据。 让我们在团队中创建backuppc文件夹。 注意:此文件夹可能会变得很大。)

mkdir -p /data0/backuppc1

为BackupPC创建一个文件夹来存储一些Web界面文件。

mkdir -p /var/www/html/backuppc1

并为backuppc创建cgi-bin目录

mkdir -p /var/www/cgi-bin/backuppc1
  1. Create and setup the backuppc user.

创建backuppc 组。

groupadd backuppc1

创建backuppc用户,并告诉它其主文件夹在哪里。 我的backuppc用户的主文件夹是/ opt / backuppc。 将此更改为您想要的任何内容。

useradd --home-dir /opt/backuppc --create-home --shell /bin/bash --base-dir /opt/backuppc --gid backuppc backuppc1
  1. Set Permissions on the directories we created:

chown -R backuppc:backuppc /data0/backuppcchown -R backuppc:backuppc /opt/backuppc12
  1. Download the BackupPC tar.gz archive and extract it.

cd ~wget https://github.com/backuppc/backuppc/releases/download/4.3.1/BackupPC-4.3.1.tar.gztar zxf BackupPC-4.3.1.tar.gzcd BackupPC-4.3.11234
  1. Run the configure.pl script

需要注意文件中的路径。

perl configure.pl --batch --cgi-dir /var/www/cgi-bin/backuppc \
--data-dir /data0/backuppc --hostname backuppc --html-dir /var/www/html/backuppc \
--html-dir-url /backuppc --install-dir /opt/backuppc123
  1. Apache config

选择了CGI路由(而不是S-CGI),并为CGI目录选择了目录/ var / www / cgi-bin / backuppc。 选择/ var / www / html / backuppc作为我的图像目录。 如果运行不带参数的configure.pl脚本,则可能需要在配置中设置此路径。

现在我们需要将Apache配置复制到apache conf.d目录中。

cp httpd/BackupPC.conf /etc/httpd/conf.d/1

注意:此文件包含“全部拒绝”和“允许127.0.0.1”。 这样就可以仅从服务器自身加载BackupPC Web界面。

我修改内容如下:

order deny,allow#deny from allallow from all123

我们需要修改apache运行的用户。

vim /etc/httpd/conf/httpd.conf1

编辑httpd.conf并更改:用户apache到用户backuppc。(group要不要也改成backuppc)

修改内容如下:

User backuppc
Group backuppc12
  1. Install the included systemd script:

cp systemd/backuppc.service /etc/systemd/system/
systemctl daemon-reload
systemctl start backuppc
systemctl enable backuppc1234
  1. Create the backuppc authentication file.

htpasswd -c /etc/BackupPC/BackupPC.users backuppc1

注意:这会将用户名设置为backuppc。

对此文件设置权限。

chown backuppc:backuppc /etc/BackupPC/BackupPC.users1
  1. Edit the config.pl file in /etc/BackupPC/

vim /etc/BackupPC/config.pl1

修改 image directory 和 image url 变量。

$Conf{CgiImageDir} = '/var/www/html/backuppc';$Conf{CgiImageDirURL} = '/backuppc';12

添加backuppc作为管理用户,这里把group也添加了进来:

$Conf{CgiAdminUsers} = 'backuppc';1
  1. Now lets start apache

systemctl start httpd
systemctl enable httpd12
  1. 访问限制

$ firewall-cmd --zone=public --add-port=80/tcp --permanent
$ firewall-cmd --reload12
  1. 关闭selinux

$ vim /etc/sysconfig/selinux
SELINUX=enforcing改为SELINUX=disable
$ reboot123
  1. 访问客户端

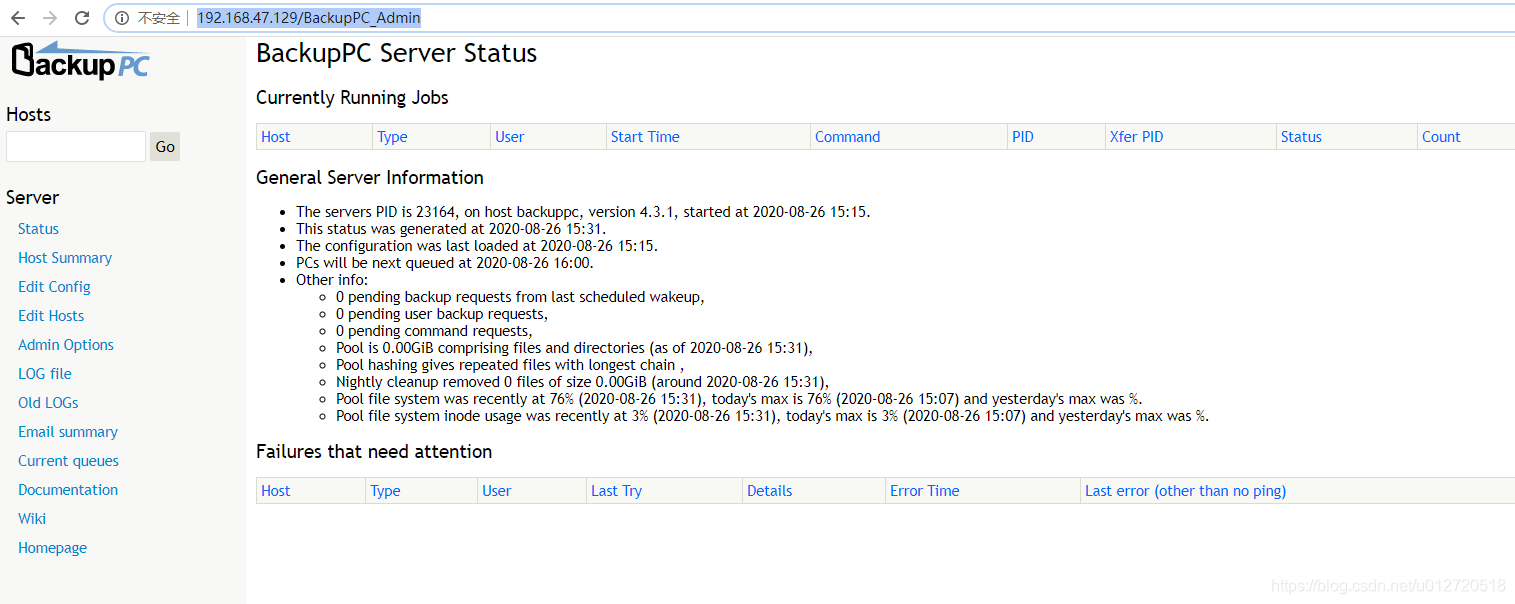
# 访问地址http://192.168.47.129/BackupPC_Admin# 这里需要输入用户名和密码backuppc/backuppc12345

在这里插入图片描述


This is a basic guide on how to install BackupPC version 4.3.1 from tarball (or git) on CentOS 7.6. We use the epel-release repository for several packages. We also temporarily use the epel-testing repository to install BackupPC-XS and rsync-bpc.

1. Enable the epel-release repo.

yum --enablerepo=extras -y install epel-release

2. Install BackupPC-XS and rsync-bpc

yum --enablerepo=epel-testing -y install BackupPC-XS rsync-bpc

3. Install the following requisites for BackupPC version 4.3.1

yum -y install bzip2 httpd mod_perl par2cmdline perl-Archive-Zip perl-CGI \
perl-Compress-Raw-Zlib perl-Data-Dumper perl-Digest-MD5 perl-File-Listing \
perl-File-RsyncP perl-Net-FTP-AutoReconnect perl-Net-FTP-RetrHandle \
perl-Time-ParseDate perl-XML-RSS perl-version rrdtool samba-client

4. Lets set up some directories that we are going to use later.

My backuppc server has a raid6 array mounted at /data0/. I am going to use this to store the data for backuppc. Lets create the backuppc folder on my raid. Note: this folder can grow to be extremely large.

mkdir -p /data0/backuppc

Now lets create one more folder for BackupPC to store some web interface files.

mkdir -p /var/www/html/backuppc

And create the cgi-bin directory for backuppc

mkdir -p /var/www/cgi-bin/backuppc

Make note of those 2 directories. The installer will ask for them if we don't explicitly set them below.

5. Create and setup the backuppc user.

Create group backuppc.

groupadd backuppc

Create backuppc user, and tell it where its home folder is. My backuppc user's home folder is /opt/backuppc. Change this to whatever you'd like.

useradd --home-dir /opt/backuppc --create-home --shell /bin/bash --base-dir /opt/backuppc --gid backuppc backuppc

6. Set Permissions on the directories we created:

chown -R backuppc:backuppc /data0/backuppc
chown -R backuppc:backuppc /opt/backuppc

7. Download the BackupPC tar.gz archive and extract it.

cd ~
wget https://github.com/backuppc/backuppc/releases/download/4.3.1/BackupPC-4.3.1.tar.gz
tar zxf BackupPC-4.3.1.tar.gz
cd BackupPC-4.3.1

8. Run the configure.pl script

Pay close attention to the paths in this command.

perl configure.pl --batch --cgi-dir /var/www/cgi-bin/backuppc \
--data-dir /data0/backuppc --hostname backuppc --html-dir /var/www/html/backuppc \
--html-dir-url /backuppc --install-dir /opt/backuppc

Alternatively, you can execute the perl script with no arguments and it will walk you through the install step by step. This is the preferred method if you are upgrading a version 3.X install. (Not supported by this guide)

perl configure.pl

9. Apache config

I chose the CGI route (not S-CGI) and chose the directory /var/www/cgi-bin/backuppc for my CGI directory. I chose /var/www/html/backuppc as my images directory. You may need to set this path in the config if you ran the configure.pl script with no arguments.

Now we need to copy the Apache config into the apache conf.d directory.

cp httpd/BackupPC.conf /etc/httpd/conf.d/

Note: This file contains "deny from all" and "allow from 127.0.0.1". This makes it so you can only load the BackupPC web interface from the server its self. You can modify this to your liking. I deleted the line "allow from 127.0.0.1" and changed "deny from all" to "allow from all".

We need to modify the user that apache runs as.

vim /etc/httpd/conf/httpd.conf

Edit httpd.conf and change: User apache to User backuppc

Note: This has the potential to break things if you use Apache for any purpose other than BackupPC. I wasn't able to figure out how to get this working without modifying this. If you have any information that would help, please update this wiki!

10. Install the included systemd script:

cp systemd/backuppc.service /etc/systemd/system/
systemctl daemon-reload
systemctl start backuppc
systemctl enable backuppc

11. Create the backuppc authentication file.

htpasswd -c /etc/BackupPC/BackupPC.users backuppc

Note: this sets the username to backuppc (modify it to your liking)

Set permissions on this file.

chown backuppc:backuppc /etc/BackupPC/BackupPC.users

12. Edit the config.pl file in /etc/BackupPC/

vim /etc/BackupPC/config.pl

Check the image directory and image url variables.

$Conf{CgiImageDir} = '/var/www/html/backuppc';
$Conf{CgiImageDirURL} = '/backuppc';

Also add backuppc as the administrative user: $Conf{CgiAdminUsers} = 'backuppc';

13. Now lets start apache

systemctl start httpd
systemctl enable httpd

14. Access the BackupPC Admin interface:

http://yourserverip/BackupPC_Admin

Log in with the username and password we created in step 11.


Centos在安装时使用了默认磁盘安装,系统装好后/home空间较大,/下的空间一般会默认分50G给/分区,在使用一段时间后/分区的空间会不够用情况,但是/home空间还剩余很多,我们可以动态的将/home空间分配给/,具体的话可以根据自己的情况去分配,分配前记得“备份”。

以我司为例,我先在测试环境测试,避免在生产环境出现问题,模拟/分区磁盘不够,扩容/分区的磁盘空间,磁盘总空间为1TB。

1、查看系统的空间。

df -hT

因很多的服务使用yum安装,或有些服务装在了/下面,慢慢的/的磁盘空间就会存在空间不足,而/home分区的空间又很大。

2、 先将home分区进行备份,删除/home文件系统所在的逻辑卷,增加/文件系统的大小,最后重新创建/home分区,并恢复/home下的数据。

tar -zcvf /opt/home.tar.gz /home/*

如果数据比较大,可以将备份放到/home下,然后下载到本地,或者通过scp传到其它服务器零时保存。

3、 卸载/home空间,如在/home目录下安装过服务,请先关闭服务,并结束进程,避免恢复都启动不起来。

终止/home下面所有进程。

fuser -km /home

卸载/home空间

umount /home

df -hT

删除/home所在的逻辑卷lv

lvremove /dev/mapper/centos-home

4、扩大/分区的空间,这里增加100G,增加100G后,还剩870G还是给/home,根据你自己的需求,进行扩容。

lvextend -L +100G /dev/mapper/centos-root

扩大/文件系统。

xfs_growfs /dev/mapper/centos-root

5、 重建/home文件系统所系的逻辑卷

/home空间总共971G,分配的100G给/还剩871G,因此我门这里创建的逻辑卷大小为871G。

lvcreate -L 871G -n/dev/mapper/centos-home

上图报空间不足,是文件系统的一种机制吧,感兴趣的可以去研究一下。我们试试分配870G,看是否可以。

lvcreate -L 870G -n/dev/mapper/centos-home

逻辑卷已经创建好了。

创建xfs文件系统。

mkfs.xfs /dev/mapper/centos-home

还是将文件系统挂载至/home目录下。

mount /dev/mapper/centos-home

df -hT

可以看到已经达到我们的目的,现在我们将/home下的数据恢复。

cd /opt/   :切换至备份目录,将其解压。

tar -zxvf home.tar.gz -C /

数据已经恢复,启动看看服务是否正常运行。

本文参考地址:https://blog.csdn.net/u013431916/article/details/80548069