centos
http://mirrors.huaweicloud.com/centos/8.3.2011/isos/x86_64/
http://mirrors.huaweicloud.com/centos/8.3.2011/isos/x86_64/
BackupPC是一种高性能的企业级系统,用于将Linux,Windows和macOS PC和便携式计算机备份到服务器磁盘。 BackupPC是高度可配置的,并且易于安装和维护。
特点:
Web interface Web界面使管理员可以查看日志文件,配置,当前状态,并允许用户启动和取消备份以及浏览和还原备份中的文件。
Data deduplication 重复数据删除:同一或不同PC的多个备份中的相同文件仅存储一次,从而大大节省了磁盘存储和磁盘I / O。 这里的相同文件删除, 啥文件算是相同的,要是仅仅同名就删除可坏菜了
Compression 由于仅需要压缩新文件(尚未合并),因此对CPU时间的影响不大。
Open-source BackupPC托管在Github上,并根据GPL许可证进行分发。
No client-side software is needed.
安装的backuppc的版本是4.3.1。(自己装着玩的用了3台虚拟机)。
Enable the epel-release repo.
Install BackupPC-XS and rsync-bpc
Install the following requisites for BackupPC version 4.3.1
Lets set up some directories that we are going to use later.
这个地方我在一台机器上创建的需要的文件夹。底下是原作者讲的话(我的backuppc服务器在/ data0 /上安装了raid6阵列。 我将使用它来存储backuppc的数据。 让我们在团队中创建backuppc文件夹。 注意:此文件夹可能会变得很大。)
为BackupPC创建一个文件夹来存储一些Web界面文件。
并为backuppc创建cgi-bin目录
Create and setup the backuppc user.
创建backuppc 组。
创建backuppc用户,并告诉它其主文件夹在哪里。 我的backuppc用户的主文件夹是/ opt / backuppc。 将此更改为您想要的任何内容。
Set Permissions on the directories we created:
Download the BackupPC tar.gz archive and extract it.
Run the configure.pl script
需要注意文件中的路径。
Apache config
选择了CGI路由(而不是S-CGI),并为CGI目录选择了目录/ var / www / cgi-bin / backuppc。 选择/ var / www / html / backuppc作为我的图像目录。 如果运行不带参数的configure.pl脚本,则可能需要在配置中设置此路径。
现在我们需要将Apache配置复制到apache conf.d目录中。
注意:此文件包含“全部拒绝”和“允许127.0.0.1”。 这样就可以仅从服务器自身加载BackupPC Web界面。
我修改内容如下:
我们需要修改apache运行的用户。
编辑httpd.conf并更改:用户apache到用户backuppc。(group要不要也改成backuppc)
修改内容如下:
Install the included systemd script:
Create the backuppc authentication file.
注意:这会将用户名设置为backuppc。
对此文件设置权限。
Edit the config.pl file in /etc/BackupPC/
修改 image directory 和 image url 变量。
添加backuppc作为管理用户,这里把group也添加了进来:
Now lets start apache
访问限制
关闭selinux
访问客户端
This is a basic guide on how to install BackupPC version 4.3.1 from tarball (or git) on CentOS 7.6. We use the epel-release repository for several packages. We also temporarily use the epel-testing repository to install BackupPC-XS and rsync-bpc.
yum --enablerepo=extras -y install epel-release
yum --enablerepo=epel-testing -y install BackupPC-XS rsync-bpc
yum -y install bzip2 httpd mod_perl par2cmdline perl-Archive-Zip perl-CGI \
perl-Compress-Raw-Zlib perl-Data-Dumper perl-Digest-MD5 perl-File-Listing \
perl-File-RsyncP perl-Net-FTP-AutoReconnect perl-Net-FTP-RetrHandle \
perl-Time-ParseDate perl-XML-RSS perl-version rrdtool samba-client
My backuppc server has a raid6 array mounted at /data0/. I am going to use this to store the data for backuppc. Lets create the backuppc folder on my raid. Note: this folder can grow to be extremely large.
mkdir -p /data0/backuppc
Now lets create one more folder for BackupPC to store some web interface files.
mkdir -p /var/www/html/backuppc
And create the cgi-bin directory for backuppc
mkdir -p /var/www/cgi-bin/backuppc
Make note of those 2 directories. The installer will ask for them if we don't explicitly set them below.
Create group backuppc.
groupadd backuppc
Create backuppc user, and tell it where its home folder is. My backuppc user's home folder is /opt/backuppc. Change this to whatever you'd like.
useradd --home-dir /opt/backuppc --create-home --shell /bin/bash --base-dir /opt/backuppc --gid backuppc backuppc
chown -R backuppc:backuppc /data0/backuppc
chown -R backuppc:backuppc /opt/backuppc
cd ~
wget https://github.com/backuppc/backuppc/releases/download/4.3.1/BackupPC-4.3.1.tar.gz
tar zxf BackupPC-4.3.1.tar.gz
cd BackupPC-4.3.1
Pay close attention to the paths in this command.
perl configure.pl --batch --cgi-dir /var/www/cgi-bin/backuppc \
--data-dir /data0/backuppc --hostname backuppc --html-dir /var/www/html/backuppc \
--html-dir-url /backuppc --install-dir /opt/backuppc
Alternatively, you can execute the perl script with no arguments and it will walk you through the install step by step. This is the preferred method if you are upgrading a version 3.X install. (Not supported by this guide)
perl configure.pl
I chose the CGI route (not S-CGI) and chose the directory /var/www/cgi-bin/backuppc for my CGI directory. I chose /var/www/html/backuppc as my images directory. You may need to set this path in the config if you ran the configure.pl script with no arguments.
Now we need to copy the Apache config into the apache conf.d directory.
cp httpd/BackupPC.conf /etc/httpd/conf.d/
Note: This file contains "deny from all" and "allow from 127.0.0.1". This makes it so you can only load the BackupPC web interface from the server its self. You can modify this to your liking. I deleted the line "allow from 127.0.0.1" and changed "deny from all" to "allow from all".
We need to modify the user that apache runs as.
vim /etc/httpd/conf/httpd.conf
Edit httpd.conf and change: User apache to User backuppc
Note: This has the potential to break things if you use Apache for any purpose other than BackupPC. I wasn't able to figure out how to get this working without modifying this. If you have any information that would help, please update this wiki!
cp systemd/backuppc.service /etc/systemd/system/
systemctl daemon-reload
systemctl start backuppc
systemctl enable backuppc
htpasswd -c /etc/BackupPC/BackupPC.users backuppc
Note: this sets the username to backuppc (modify it to your liking)
Set permissions on this file.
chown backuppc:backuppc /etc/BackupPC/BackupPC.users
vim /etc/BackupPC/config.pl
Check the image directory and image url variables.
$Conf{CgiImageDir} = '/var/www/html/backuppc';
$Conf{CgiImageDirURL} = '/backuppc';
Also add backuppc as the administrative user: $Conf{CgiAdminUsers} = 'backuppc';
systemctl start httpd
systemctl enable httpd
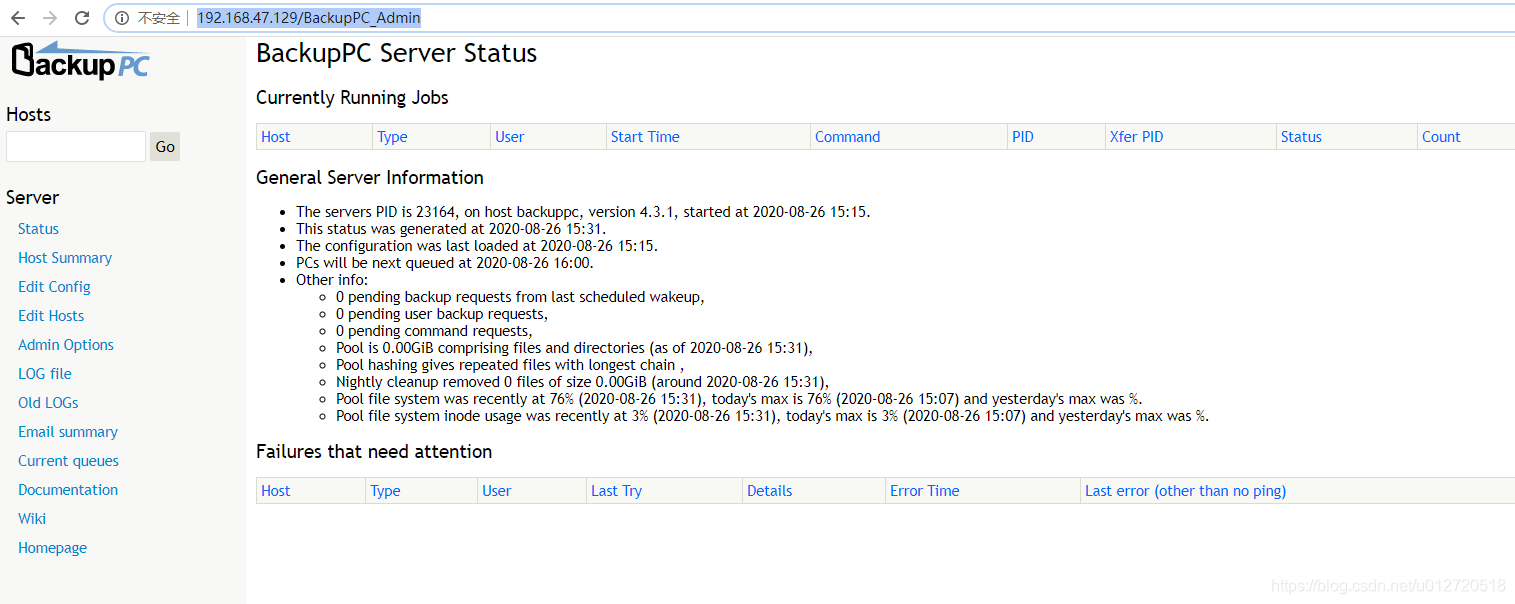
http://yourserverip/BackupPC_Admin
Log in with the username and password we created in step 11.
Centos在安装时使用了默认磁盘安装,系统装好后/home空间较大,/下的空间一般会默认分50G给/分区,在使用一段时间后/分区的空间会不够用情况,但是/home空间还剩余很多,我们可以动态的将/home空间分配给/,具体的话可以根据自己的情况去分配,分配前记得“备份”。
以我司为例,我先在测试环境测试,避免在生产环境出现问题,模拟/分区磁盘不够,扩容/分区的磁盘空间,磁盘总空间为1TB。
1、查看系统的空间。
df -hT
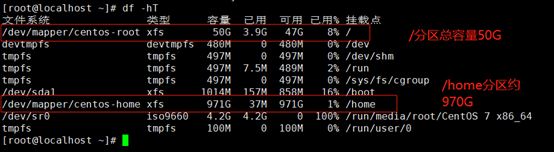
因很多的服务使用yum安装,或有些服务装在了/下面,慢慢的/的磁盘空间就会存在空间不足,而/home分区的空间又很大。
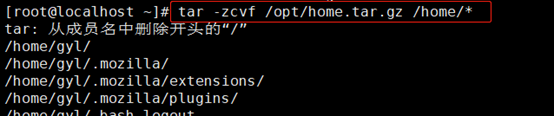
2、 先将home分区进行备份,删除/home文件系统所在的逻辑卷,增加/文件系统的大小,最后重新创建/home分区,并恢复/home下的数据。
tar -zcvf /opt/home.tar.gz /home/*
如果数据比较大,可以将备份放到/home下,然后下载到本地,或者通过scp传到其它服务器零时保存。
3、 卸载/home空间,如在/home目录下安装过服务,请先关闭服务,并结束进程,避免恢复都启动不起来。
终止/home下面所有进程。
fuser -km /home

卸载/home空间
umount /home
df -hT

删除/home所在的逻辑卷lv
lvremove /dev/mapper/centos-home

4、扩大/分区的空间,这里增加100G,增加100G后,还剩870G还是给/home,根据你自己的需求,进行扩容。
lvextend -L +100G /dev/mapper/centos-root

扩大/文件系统。
xfs_growfs /dev/mapper/centos-root

5、 重建/home文件系统所系的逻辑卷
/home空间总共971G,分配的100G给/还剩871G,因此我门这里创建的逻辑卷大小为871G。
lvcreate -L 871G -n/dev/mapper/centos-home

上图报空间不足,是文件系统的一种机制吧,感兴趣的可以去研究一下。我们试试分配870G,看是否可以。
lvcreate -L 870G -n/dev/mapper/centos-home

逻辑卷已经创建好了。
创建xfs文件系统。
mkfs.xfs /dev/mapper/centos-home

还是将文件系统挂载至/home目录下。
mount /dev/mapper/centos-home

df -hT
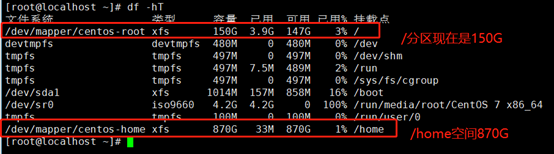
可以看到已经达到我们的目的,现在我们将/home下的数据恢复。
cd /opt/ :切换至备份目录,将其解压。

tar -zxvf home.tar.gz -C /

数据已经恢复,启动看看服务是否正常运行。
本文参考地址:https://blog.csdn.net/u013431916/article/details/80548069
情况:
home:500G
root:50G
root分区不够用
思路:把home分区的空间划一部分到root分区
1 2 3 4 5 6 7 8 | # 设置home分区大小为200G,释放300G空间$ lvreduce -L 200G /dev/centos/home# 将空闲空间扩展到root分区$ lvextend -l +100%FREE /dev/centos/root# 使用XFS文件系统自带的命令集增加分区空间$ xfs_growfs /dev/mapper/centos-root |
实例
situation
挂载在根目录的分区 /dev/mapper/centos-root 爆满,占用100%
1 2 3 4 5 6 7 8 9 10 | $ df -hFilesystem Size Used Avail Use% Mounted on/dev/mapper/centos-root 50G 50G 19M 100% /devtmpfs 32G 0 32G 0% /devtmpfs 32G 0 32G 0% /dev/shmtmpfs 32G 2.5G 29G 8% /runtmpfs 32G 0 32G 0% /sys/fs/cgroup/dev/mapper/centos-home 476G 33M 476G 1% /home/dev/sda1 497M 238M 259M 48% /boottmpfs 6.3G 0 6.3G 0% /run/user/0 |
analyze
挂载在根目录的分区空间太小,只有50G,而服务器 home 目录为非常用目录,挂在了近500G的空间。
思路:从 centos-home 分区划出300G空间到 centos-root 分区。
operation
1.查看各分区信息
1 2 3 4 5 6 7 8 9 10 11 12 13 14 15 16 17 18 19 20 21 22 23 24 25 26 27 28 29 30 31 32 33 34 | $ lvdisplay--- Logical volume ---LV Path /dev/centos/homeLV Name homeVG Name centosLV UUID 1fAt1E-bQsa-1HXR-MCE2-5VZ1-xzBz-iI1SLvLV Write Access read/writeLV Creation host, time localhost, 2016-10-26 17:23:47 +0800LV Status available# open 0LV Size 475.70 GiBCurrent LE 121778Segments 1Allocation inheritRead ahead sectors auto- currently set to 256Block device 253:2--- Logical volume ---LV Path /dev/centos/rootLV Name rootVG Name centosLV UUID lD64zY-yc3Z-SZaB-dAjK-03YM-2gM8-pfj4ooLV Write Access read/writeLV Creation host, time localhost, 2016-10-26 17:23:48 +0800LV Status available# open 1LV Size 50.00 GiBCurrent LE 12800Segments 1Allocation inheritRead ahead sectors auto- currently set to 256Block device 253:0 |
2.减少/home分区空间
1 2 3 4 5 6 7 8 | # 释放 /dev/centos/home 分区 300G 的空间# 命令设置 /dev/centos/home 分区 200G空间$ lvreduce -L 200G /dev/centos/homeWARNING: Reducing active logical volume to 200.00 GiB. THIS MAY DESTROY YOUR DATA (filesystem etc.)Do you really want to reduce centos/home? [y/n]: y Size of logical volume centos/home changed from 475.70 GiB (121778 extents) to 200.00 GiB (51200 extents). Logical volume centos/home successfully resized. |
3.增加/root分区空间
1 2 3 | $ lvextend -l +100%FREE /dev/centos/rootSize of logical volume centos/root changed from 50.06 GiB (12816 extents) to 325.76 GiB (83394 extents).Logical volume centos/root successfully resized. |
4.扩展XFS文件空间大小
1 2 3 4 5 6 7 8 9 10 11 | $ xfs_growfs /dev/mapper/centos-rootmeta-data=/dev/mapper/centos-root isize=256 agcount=4, agsize=3276800 blks = sectsz=512 attr=2, projid32bit=1 = crc=0 finobt=0 spinodes=0data = bsize=4096 blocks=13107200, imaxpct=25 = sunit=0 swidth=0 blksnaming =version 2 bsize=4096 ascii-ci=0 ftype=0log =internal bsize=4096 blocks=6400, version=2 = sectsz=512 sunit=0 blks, lazy-count=1realtime =none extsz=4096 blocks=0, rtextents=0data blocks changed from 13107200 to 85395456 |
完成
以上就是本文的全部内容,希望对大家的学习有所帮助,也希望大家多多支持脚本之家。